


Deck and Pool Build
The improvements we made to the deck and the addition of the pool were two distinct projects separated by three years. The picture below shows the end result of the two projects.

The First Project - Bigger Deck with New Decking and Rails
The decision to do the first project started with deciding we needed to stain the deck. It was a couple of years after we bought the house, and the deck was not stained originally and felt it needed to be. As we struggled to find a stain color that we were happy with, I couldn't get rid of the thought that I was going to have to do this every year or two for the life of the deck. I decided the wooden deck's life span was going to be severely shortened, and our thinking changed from staining to replacing the deck boards and railing.
With this change of plan, we also decided this was an opportunity to increase the size of the deck. It always seemed that the furniture, grill, and smoker was crowding the deck. Increasing the deck by half again would add a lot of extra space. I changed the design from the original size of 19' x 12' to 19' x 18'.
We also looked at one other option; we thought about turning the space the deck occupied into a permanently roofed screened in porch. I did a preliminary design, decided this was beyond my skill and capability level, and contacted a contractor specializing in this type of home improvement. After he gave us the $37,000 estimate which didn't include the electrical or the screens, we trashed this idea continued with our do-it-yourself deck modification.
I looked at various options from Home Depot to online deck supplies, and we decided to go somewhere we could see the decks and talk with people who really knew something about decks. This turned out to be KC Deck Supply in Overland Park. We found the maintenance free deck boards (Envision) and the maintenance free aluminum black railing that was exactly what we wanted. They took my design drawing and turned it into to a complete materials list for everything we needed for the decking and the railing. I then went to Home Depot for the framing boards, support posts, screws, hangers, cement, and support pier tubes.
The Original Deck
There was nothing really wrong with our original deck, but there were two things that weren't right. It was about to become a maintenance pain, and it wasn't as big as we wanted it to be. And it was going to be a maintenance pain! (That's worth saying twice.)


Notes on the First Deck Expansion
I need to explain that "we" did this project; it was definitely a Terry and Nancy project. Nancy helped and supported me all the way though the project and I could not have done it without her help.
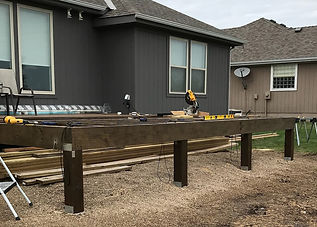
The first step in the build was to remove the existing railing. Once the railing was removed, it was time to dig and pour the piers for the new support posts required for the additional 6' x 19' of deck.
I tried to use an 12" gas-powered auger to dig the holes for the pier support tubes. That was a lost cause. There was a lot of clay and the auger either clogged up or stalled. After two hours trying to a dig hole with the auger and only getting down two feet of the first of four holes, I brought the auger back to Gerken Rent-All and traded it for a mini-excavator. After that I had a Tool-Time-Tim moment and dug a ditch that was plenty wide and plenty deep enough for all four support tubes.


As the picture below shows, I had to build some supports for the tubes to keep them upright and level. It was at this point in the process that the Louisburg City engineer had to inspect the installation of the piers which had to be 3' or greater in depth. When he came around the side of the house and looked at my support tubes installation, he started laughing and said, "You're an engineer, aren't you?" I'm guessing that was some reference to my penchant for overkill.
Whatever, I passed the inspection.
I didn't have a problem with the ditch and mounting and supporting the pier support tubes, but I wasn't up to mixing and pouring the cement by myself. My son and his wife, Jason and Jill, helped me mix and pour the cement. That was a big help.


After the piers cured and I rented a sump pump, I backfilled around the piers. We then installed the new support posts and built the frame for the deck addition. Nancy, along with the rest of the deck frame, stained the new frame.


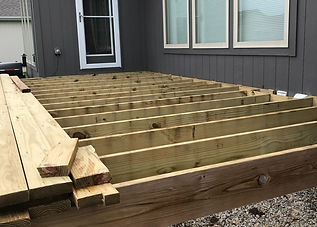
The frame is now done so it's off with the old deck boards. However, before the new deck boards went on, we had a few tasks to complete.
Nancy had to stain the frame while we had it exposed. We knew this was our only chance to add a layer of protection to the wood before putting on the new deck.
My jobs at this time were to run the wiring for the railing lights and the exterior outlets, and to install extra boards under the rail post locations for lag bolts.
The aluminum railing had optional lights that went under the top cap of the support posts. We liked the idea of the lights, so we added them to the posts. They are 24 vdc lights and are powered from a controller/transformer that turns the lights on at dusk and off at dawn. I ran exterior zip cord to the locations of the nine post lights we were going to install to the location of the controller (back right corner of the deck as viewed from the back of the house).
I also ran some direct burial cable from the GFCI outlet near the entrance to the house to four locations where I would later add electrical boxes. Two boxes were going on the outside frame of the deck on either side near the lawn side of the deck, the third was on the left side of the house above the deck for power to the awning. The fourth would be installed on the side of the house at the back right corner of the deck to power the railing light controller.
The railing supports needed to be lag screwed into the frame. I planned for this by screwing additional 2x6 or 2x4 short pieces to the sides of the deck support boards under area where the rail support posts were to be installed.
With the wiring, staining, and rail support post frame work complete, we could start installing the new deck boards. We stored the old deck boards under the deck frame. I had to move them once to keep them from literally being "under foot" but it was a good place to store them until I found other uses for them.
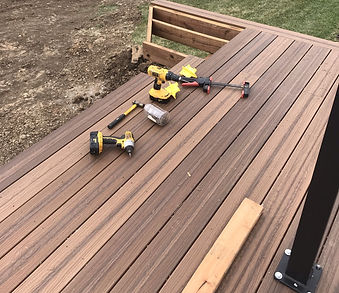
The deck boards were 20' long so I was able to use a single board to reach across the entire width of the deck. I did a "picture frame" installation so that the ends of the board were hidden.
After the deck boards were all on, I could start the installation of the railing. I used four 4" lag bolts on each support to mount the supports. This secure method of mounting the posts provided an additional benefit; I could loosen and tighten the bolts to get the post exactly level. There was enough strength in bolt-to-wood connection that a "little less here" and a "little more there" didn't affect the overall mounting and they were level.
I mentioned 'picture frame" above. Underneath the railing below, you can see the one deck board running along the outside of the decking. That's the "picture frame" board.
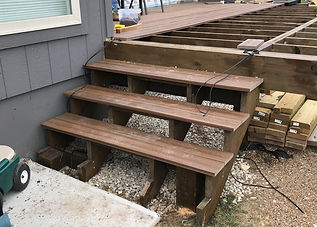
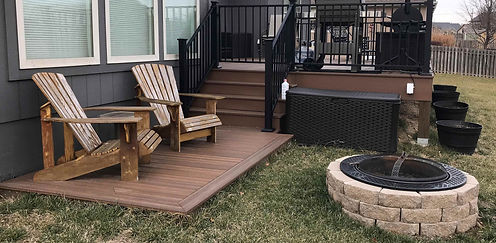
There was a cement pad at the bottom of the stair that the contractor installed. It was what I asked for but not what I wanted when I saw it. It served the purpose of providing a threshold for the stairs but that's it. I had a few deck boards left so I built a lower deck as the threshold to the stairs over the cement pad. This deck was 5' x 8' and provided space for two of our Adirondack chairs.


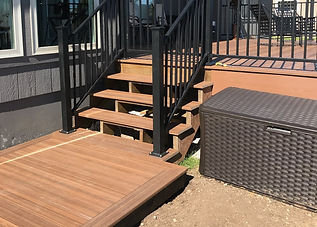
We decided to take this lower deck one step further (a couple of years later) and put in a fire pit. It's a nice place to sit in the evening and burn up some of my scrap wood.
You can also see the trim board we installed on the side of the deck frame. This board is the same color and texture family as the deck boards and does a nice job of blending the frame with the deck.
The white rectangle on the right end of the trim board is one of the electrical outlet boxes.
This is the end of the first deck project. We completed this in October 2018. It would be September 2021 before we started the next project

A Pool and More Deck - September 2021
A little history first. We first moved to Kansas the first time in 1979 and bought a house in Stilwell. The house was built on two acres of land which meant lots of mowing. I bought a riding lawnmower, but it was still a lot of mowing and Kansas summers are hot. I'm not sure we ever got thru a summer without a few days over 100. It was one of those hot days that I was mowing and decided that it would be great to jump in a pool after I was finished. That's when I decided we needed a pool.
Fast forward to 2021, five moves later, we're living in Kansas again and I just finished mowing at our storage shed lot down in Lynn Valley Lakes. I'm hot and thinking it would be great to jump in a pool. When I came home to tell my dear wife this, her response was total exasperation with me (a not uncommon condition for Nancy) and then relief and excitement. She had wanted a pool since we had been back in Kansas, but I always dismissed the idea because of all the maintenance required and problems we had with our last pool. I was "never going to have a pool again".
At about this same time, Nancy's sister Brenda was having a saltwater pool installed at her house in New York. I had no idea why she wanted a saltwater pool, so I did a little research. I learned about the low-maintenance advantages of a saltwater pool, and I changed my mind.
Selecting the Pool
After some research I went to The Pool Factory to pick out our pool. We decided on a 15' round by 54" high saltwater pool with equipment capable of working with saltwater. The pool I picked out had a continuous resin composite side wall. The description claimed the resin wall was stronger than either steel or aluminum, and based on 3 years of experience with it, so far so good.
The pool equipment I picked out was the recommended pump, cartridge filter, and chlorine generator. All of these were of a higher capacity than that required for a 15' diameter pool. I upgraded the liner to a 25-gauge thickness. I also bought a resin fence to be installed on top of the pool walls. I checked with the Louisburg City engineer, and he agreed that the specifications of the fence meet the city fencing requirements.
One important feature that we required was that this above ground pool could be partially installed underground. Our plan is to match the elevation of the top of the pool the deck elevation. The grade nearest the deck would have to be lowered before installation of the pool. After installation of the pool the area around the pool near the deck would be backfilled to match the surrounding grade.
Designing the Pool and Deck Installation
The basic installation plan was to center the pool so that the edge of the pool was 4' from the edge of the existing deck. I'd then add a new deck section to go from the edge of the pool to the existing deck. The top edge cover of the pool has an overhang of about an inch. I back calculated this overhang, the rough distance I wanted from the pool edge to the deck edge, and the width of the deck boards plus board-to-board space to come with an exact distance between the deck and the pool edge. Accounting for deck board overhand and having to account for the pool side supports, the distance from deck frame edge (after removing the trim board) and the pool wall was 52". Add 7.5' (radius of the pool) to that and you have 142" from the existing deck frame and the center of the pool. I based my design drawing of the pool location and the deck addition on this distance.
The design included determining the placement of two new frame support piers. I struggled with this for a while trying to make sure two piers would satisfy the Louisburg building codes. I was able to abide by the codes by adding an additional board to the beam and spacing the piers at the outer dimension of allowed spacing. The position of the piers also had to allow for the cantilevered sides of the new deck frame that hang over the beam.
Grading the pool sub surface area and installing the support beam piers.
A perfectly level grade at the base of the pool has to be 54" below the top of the deck. The pool wall sits on mounting plates positioned at the circumference of the pool. These plates have to be installed at the proper level so that the pool top ends up at the deck level. At the time of the grading, I also had to dig the holes for the two pier support tubes for the new frame support posts.
I set up a laser level at the top of the deck and Nancy helped me to keep track of the grade level with an elevation stick as I graded the pool area with a mini excavator. I dug the holes for the pier support tubes at the same time.
I should mention that the bottom of the pool and the base of the pool are two different things. The base is the dirt at the -54" level with respect to the pool deck. The pool bottom is at the -51" level. A three inch layer of mason sand is spread over the pool base to provide a smooth, stone free surface for the pool liner.
Marking the Center of the Pool
I knew the measurement from the deck to the center of the pool was 142", but that measure from the deck is about 4" from the newly graded ground level. I determined the center of the deck and set up a laser lever there using a square to keep it beam perpendicular to the edge of the deck. Then I set up a laser measurement tool on the deck to establish the 142" distance to a ladder holding a target board at the center of the pool area. Then all I had to do is use a long level from the target board down to the ground to mark the pool center. Easy (if you have 5 arms and help).
After marking the pool center, I drove a 1/2" pipe a couple of feet into the ground keeping it perpendicular to permanently mark the center of the pool. The pipe served another purpose. I used this to hold a 1/2" threaded rod that was the center point a pool radius measurement board I used to mark the circumference of the pool.
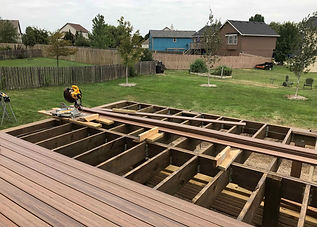
Building the Deck Frame
All the excavation work and grading are now complete (other than backfilling that will happen later). I can now set the pier tubes, pour the cement, and build the pool deck.


Final Pool base Preparation
After the deck frame was installed, I put nine rows of deckboards on the frame. I did this to get an exact measurement from the deck to the grade level of the bottom of the pool base. My measurement prior to this had be based on lasers and levels; I wanted to double check it against the actual pool deck. After I had the measurement, I spent some more time on the pool grading to make sure it was at the correct elevation and level.
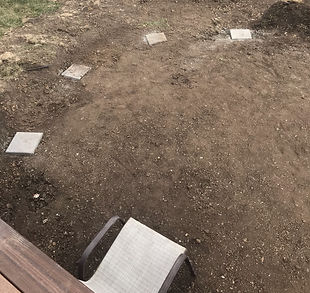
I then installed 10 concrete pads at the points where the pool wall supports would be mounted. The top of the blocks are level with pool base grade. I also removed a 10" strip of dirt about 2" deep around the circumference of the pool and replaced the dirt with a dry mortar mix that I tamped down to the pool base level. The mortar and the concrete patio blocks form a level, solid base for the lower pool wall guides. I used the radius board shown below to periodically check the level of the circumference.
.jpg)
Installing the Pool
The installation starts with the mason sand that needs to be spread on the base. The pool vendor recommends a 3" base and I found online recommendations of 2" to 3" base of sand. I settled for around 3" more or less. We put down a 3" thick layer of sand on the base without getting too close to the circumference of the pool. I didn't want to chance getting sand in the lower pool wall guides on the pool circumference. I also wanted to get as much sand inside side the pool before the wall went up, so we didn't have to throw bags.
I first installed the two wall supports that were next to the deck. Once the wall was up, I wouldn't be able to get back there to set the supports. I then rolled out the wall with the end attached to the deck. Having the wall attached to the deck like having a couple of extra people holding up the wall. Jenny and Nancy were there to suppor the wall as I unrolled it and I put a few tie-downs to keep it from tipping in. Once the wall was completely unrolled, I had to make minor adjustments to the position of the wall to get the two ends to meet. After the adjustments, the wall settled into the lower wall guides, and Jenny and I connected the two ends with one of us on either side of the wall. There was a connection plate with a bunch of bolt holes for both side of the wall and matching holes in the ends of the pool wall. I put the wall supports up at this time also.
With the pool wall up, we could finish putting the sand on the base of the pool and getting it level and tamped down. After that we glued a thin sheet of styrofoam insulation on the inner pool wall. The foam cove pieces went in after that. I didn't want to mess with trying to build a cove out of sand as is sometimes done so I bought the foam cove when I bought the pool. Call me lazy, I mean, look! Nancy's installing the cove and I'm sitting down taking pictures. Note: The cove is required to take the strain off the liner as it transitions from the horizontal pool bottom to the pool wall.
The next step was the pool liner. I spread the liner out in the sun to warm up during the day so I'd have an easier time spreading it out in the pool, but the evening caught up with me. The temperature dropped, the liner stiffened up, I stiffened up, and that was the end of the work for today. I had the liner partially installed, but I still needed to work all the wrinkles out of it and get in pulled up equally all around the wall.


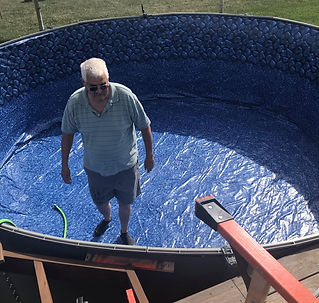
The following day was warm and I used hot water to start to fill the pool and work out the pool wrinkles. It went much better with warmer conditions. Once I was satisfied with the liner, I put wall ledge and the ledge caps on. I then continued filling the pool. I stopped filling the pool below the level of the inlet water jet and installed the water jet and the skimmer.
After the skimmer and the water jet were installed, I connected the pump, filter, and chlorinator and started circulating water to make sure everything worked. It was late September, so we weren't able to go swimming. I didn't buy the pool heater until the following april.


Installing the Pool Fence
The white, plastic fence that is mounted above the level of the pool wall top rail is attached to the pool at the wall supports. When the pool arrived and I looked at the pool wall supports and the pool fence supports, I didn't see that there was anything in the wall supports to hold the pool fence support screws. The screws would rip out at the first high wind, and we get high winds in Kansas.
To provide adequate purchase for the pool fence support screws, I put a 2"x4" backing board in each of the pool wall supports (see right). Now, instead of just the plastic support wall, the screws went thru the support wall and into the 2x4 and were secure.


The installation of the fence went fine. Then, a couple of days later, those high Kansas winds came along and took down about half of the fence. The problem with the fence was the way the top and bottom horizontal pieces screw into the upright support. The Horizontal piece fits into a hole in the upright but doesn't go in very far. It's hard to get a secure, screwed connection between the post and the horizontal rails. I had some extra plastic fence because the fence kit I bought came with 10 sections and I only used 7. I cut off the sides of an extra rail and made short strips that I installed over the connection between the fence support and the horizontal rails. Now instead of four screws holding the rails to the posts, there are 8 (see below right). After 3 years, we haven't had any more problems with the fence.


Finish Up the Deck and the Deck Fence
The last of the deck had to be done after the pool wall top ledge had been installed so that I could fit the deck to the ledge. The railing went on after the deck was complete. I can't remember when during the process that I cut in the gate to the pool, but that also was completed.
We added a few things the following year. The most significant of the these additions was the pool heater. I bought a FiberPool 55,000 btu heater that heats our pool water about 1 degree per hour. I debated the type of heater to get. We have natural gas at the house so I could get either a gas or electric heater. Conventional heaters were a less expensive option at the time of purchase, but they were much higher operating cost. The more expensive option was a heat pump and I went with that. The heater I chose had COP (Coefficient Of Performance) of about 5.8 making it very efficient. COP of 5.9 means for every watt of electricity the heater consumes, it provides 5.9 watts of water heating power (at ideal operating conditions). The heater was easy enough to install next to the pump and filter, but it needed a 30 amp, 240 vac power feed. I had already used all but one of the spare breaker slots for other project, so some rearranging was required. Also, I had to route 10-3 wire from the breaker box out to a new disconnect box next to the heater. I used direct burial cable to keep the outside run of the cable within code.
The downside to heat pumps, besides the higher initial cost, is the requirement for the ambient temperature be above 50 degrees. It can be argued that they will work below that temperature, but I found that they were close to useless at a lower temperature. I thought this might be a problem, but I went with the heat pump anyway. I'm glad I did. If the ambient temperature is anywhere near 50 degrees, we're not going to swim no matter how warm the pool is. Also, the heat pump is efficient enough that I don't worry about babysitting its operation to pinch pennies.
I also added a remote option to move the controller from the heater up to the deck rail.
The last addition I made to the pool was to add a patio umbrella to one side of the pool. Some of the days we get in the pool are just too hot to be in the direct sun. The umbrella provides enough shade to stay in the pool and enjoy our swim (or more accurately "our float")